
BOR Teams and Groups Documentation
- General Microsoft Team’s help website
- General Microsoft Team’s video training
- Our Teams FAQ for how Teams is used by our institution.
- Dial in numbers are automatically available if you schedule your meetings using Teams. Check out the updated FAQ for meetings/calls.
- Refer to the BOR Teams and O365 Groups FAQ for more information about creating and using Microsoft Teams or O365 Groups.
- Microsoft Team’s help website
- Microsoft Team’s video training
- Best practices on successful Teams Live Events
How do I get up and running using Microsoft Teams? View the specific topics on the Microsoft Team’s help website or view video tutorials on the Microsoft Team’s video training.
Check out the updated FAQ for meetings/calls/Audio Conference PIN info and using chat.
Questions:
Q: How do I sign in to the Microsoft Teams app?
A: How to Sign in to the Microsoft Teams App on your Computer:
- Download and install the Microsoft Teams app from this page: https://www.microsoft.com/en-us/microsoft-365/microsoft-teams/download-app
- When you install the app, it will ask you for your email – use your NETID click on Sign in:
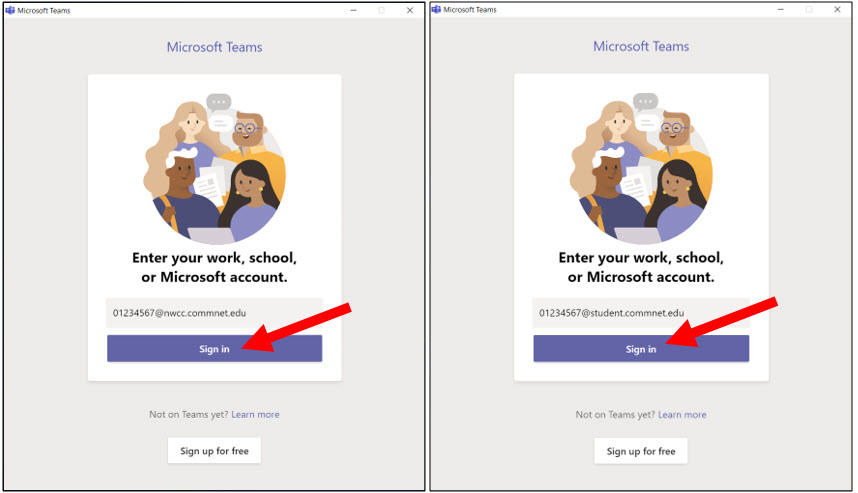
- You will be redirected to the CSCU Login Portal – put in your current password and click Sign in:

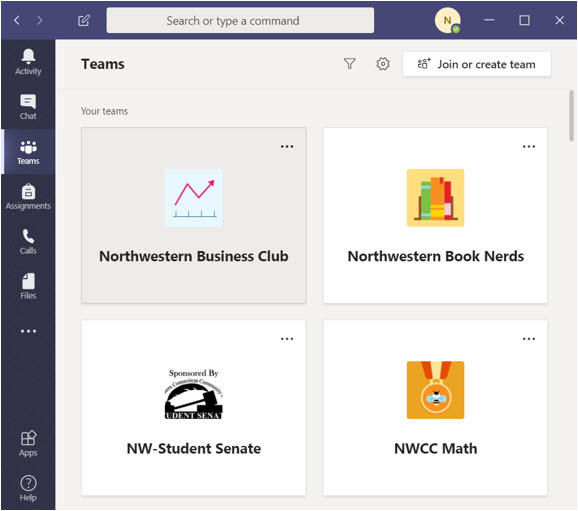
- Once logged in, you should see the Teams where you are a member:
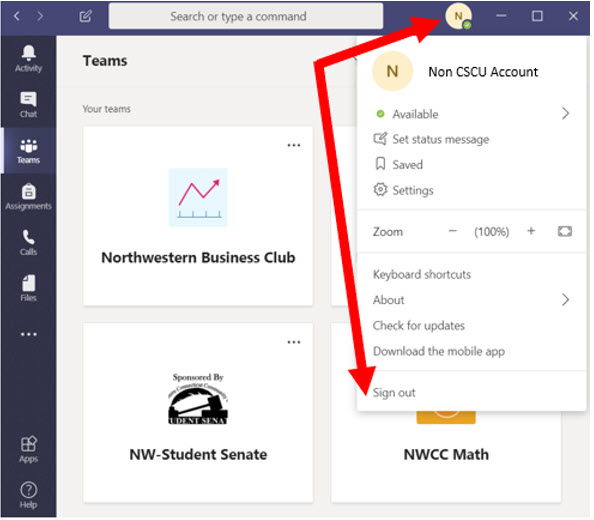
- If you are logged into Teams with a personal account, you must Sign Out and Sign In with your college account by clicking on the circle icon in the upper right-hand corner, and clicking on the Sign out button at the bottom of the list:
- How do I decide which to create: A Microsoft Team or an Office365 Group?
- How do I convert an O365 Group to a Microsoft Team aka ‘teamify’?
- How do I create a Microsoft Team?
- What do I have to know about expiration/renewal/deletion?
- What are Private channels in a Team?
- How do I use the chat feature in the Teams app?
- How do I use meetings or calls in Microsoft Teams?
- Can I use Outlook 2016 to manage my Group/Team?
- How do I rename an Office365 Group/Microsoft Team?
- Can my group/team use my college’s domain (i.e. groupname@xxcc.commnet.edu or groupname@college.edu)?
- What do I need to know about Public/Private groups/teams?
- What does it mean to be listed/hidden from the email address list?
- There seems to be so many ways to access my group or team’s features (mail, documents, calendar). What’s the easiest?
- Is there an app for that?
- How do I work with my Team’s shared calendar?
- How do I work with my O365 Group’s shared calendar?
- What do I need to know about co-authoring documents with others?
- Can I be alerted when an item is modified?
- Can I stay a member of a group but stop receiving email in my inbox for emails sent to the group?
- My group’s email address and SharePoint site are different than my group’s name. Why?
- How do I change my group/team site’s home page?
- How do I use Office365 Groups?
- How do I use Microsoft Teams?
- How do external guests access O365 Groups/Microsoft Teams?
- How does external guest access differ from a CCC or System Office Faculty/Staff/Student?
Answers:
- How do I decide which to create: A Microsoft Team or an Office365 Group?
So, you know you need collaboration but not sure where to start. You’ve heard about O365 Groups and Microsoft Teams. You may have heard that a Microsoft Team contains an O365 Group. So, what do you create, and how do you create one?
* If you haven’t created the group yet, we suggest creating a Microsoft Team and using the Microsoft Team app for collaboration. Creating a Microsoft Team has you fully using the Microsoft Teams app for all your collaboration. Chatting, conversations, file sharing all occur within the Microsoft Team app. No more cluttering up your email inbox.
* However, if you already have an Office365 Group and now want to add the collaboration from a Microsoft Team, you can create a Microsoft Team from your O365 Group. Just launch the Teams app, click Teams then “Join or create a Team”. Refer to our FAQ item for converting an O365 Group to a Microsoft Team.
Read this article to find out more about O365 Groups vs. Teams.
Ready to create a Microsoft Team!? Read our FAQ article on creating a Team.
- How do I convert an O365 Group to a Microsoft Team aka ‘teamify’?
If you already are an owner of an Office365 Group and now want a Microsoft Team for collaboration with group members, you can create a Microsoft Team from an O365 Group. Just launch the Teams app and when you create a Microsoft Team, it will ask you if you want to create one from a group you already own. You will need to manually move items from the areas in your O365 Group that are not accessible from inside the Teams app into Teams, so please continue reading:
- If you already have a OneNote notebook in your group, in order to see it from your Team, you need to add a tab in order to access it. From one of the Team’s channels, click the Add button to add a tab:
Then select OneNote from the list and locate your group’s OneNote notebook in the list. By default, they are named <Group’s name> Notebook. Select the name and click Save. You will then have a tab to access your OneNote notebook.
- You will have to manually move content from the original group’s document library to one of your team’s channels in order to access it from your new Microsoft Team. Microsoft Teams organizes topics by channels. NOTE: Content not in a channel will not be accessible from inside the Team. By default, a Team creates the General channel, but you can create other channels if you wish. To move files from the O365 Group shared document folder to a Team’s channel, visit your Microsoft Team’s site by opening the channel using SharePoint:
Once in SharePoint, you’ll see you are in your General channel’s document library. Simply click Documents to see any files that are in the O365 Group that are not visible from inside your team:
Then move folders/files you want accessible from inside your Team to a channel’s folder (for example General).
Verify you can now access the folders/files by going back to the Team app and look in a channel’s files section. You’ll see the files are now accessible from within Teams.
NOTE: Do not use SharePoint to modify folders in a Microsoft Team. If you edit/remove a channel’s folder, it makes it inaccessible in your Team.
- Before you converted your O365 Group to a Microsoft Team, you used an email address to communicate with members. Members may also have been subscribed to the O365 Group and have those emails also go to their inboxes. Now that it is a Microsoft Team, collaboration should be occurring inside Microsoft Teams and members no longer have to clutter up inboxes with messages from the group, instead collaboration should be occurring from inside the Microsoft Teams app.
So, what happens with that email that is associated with the O365 Group (<group name>@groups.ct.edu)? It still goes to the O365 Group mailbox but it is not accessible from inside the team app by design so that collaboration occurs inside Microsoft Teams instead of email.
However, if you need to have members view the email that is sent to that address from inside Teams (say you publish that address somewhere and non-members send email to it), this workaround may bridge the gap. You will need to send that email to a Team’s channel. First, in Outlook, edit the group and enable the setting to subscribe new members so they receive group conversations in their inbox:
Then, inside Teams, right click the channel and select Get email address:
and copy the channel’s email address. Then, right click the Team’s name and select Add member and add the Team’s channel (paste just the email address portion, not the name part) to be a member of the Team as a guest. Then, when an email is sent to the O365 Group’s email address, it will also go to channel. Remember to go back to your group and deselect the “Subscribe new members” option.
If group members are receiving email sent to the O365 Group’s inbox in their inboxes, it’s because they are still subscribed to the group. They can go to Outlook, select the group and select “unsubscribe” in order to stop receiving email in their inboxes.
- How do I create a Microsoft Team?
There is lots of info in the FAQ article “How to use a Microsoft Team” that is relevant for using your Microsoft Team once you create it – so make sure you refer to that as well.
NOTE: You cannot merge two different Microsoft Teams, so make sure before you create a new Microsoft Team that there already isn’t one for the same purpose with the same members you intend to invite. For example: If there already is a Microsoft Team named “XYZ” and you attempt to create another Microsoft Team named “XYZ”, it will simply create a “XYZ-12348324793” for the new one but it will still use the display name “XYZ”, so you won’t know there already was one that existed. Ask colleagues if a team already exists before creating a new Microsoft Team.
Here’s how to create your team:
Once you have the Microsoft Teams app installed and you have logged into it, click on Teams in the left panel, then “Join or create a team”, then select “Create a team”:
If your team type isn’t listed, choose “Other”, then next. Each Team type has slightly different permissions and OneNote notebook types.
Configure your Team’s name, description and privacy
Please make sure you refer to proper naming standards (which is always a click away when creating your team by clicking the “See your organization’s guidelines” link). Examples of teams using proper naming standards are: (TX-RoboticsClub, GW-Marketing, AS-Biology101Fall2019, SO-VPSearchCommittee, CCC-Facilities)
Also give your team a proper description.
Very important is setting your team’s privacy type. You most likely want it to be a private group – NOT public. If it’s public, it means anyone can view/modify content without joining and becoming a member. If you think you want a public group – read this FAQ article about public vs. private groups/teams first.
NOTE: If you already have an O365 Group and are “teamifying” it, then select “Create a team from an existing Office 365 group” to teamify your O365 Group. If you haven’t already, refer to this FAQ article about converting an O365 Group to a Microsoft Team. If you have another team you want to copy, select “Create a team using an existing team as a template”, then on the next screen you can select what parts you want to copy to the new team.
Then click Next to create your team.
Adding members (or not yet)
At this point, you don’t have to add any members initially if you want to customize the Team before adding other members. But if you want to add members at this time you can. When you add members, they will receive an email letting them know you have added them to your Team. To add System Office/CCC users, just type their name. For anyone else, you will need to add them by their email address. Remember to always add CSCU University members by their CSCU email address and not a personal (yahoo/Gmail) address. Refer to this FAQ about external guests.
Also, we recommend making at least one other member an owner of your Team so there are at least 2 owners for your Team. You can do this by toggling the member from “member” to “owner”.
When you are done adding members, click close.
Notifications
If you want to be notified about various things happening in Teams, make sure you enable Team notifications (check out the FAQ article on How to use Teams for how to setup notifications). You may want to let members know they can setup channel notifications so they are alerted when there is activity:
We recommend looking at your Team’s settings (Manage Team – Settings) and configuring them from the start before members start using your team. We highly recommend you review Member permissions and Guest permissions and select what is appropriate. You may want to disable some permissions your members have by default such as creating private channels or deleting them.
That’s it! Your Team has been created.
- What do I have to know about group expiration/renewal/deletion?
Did you receive a notification that your group/team was deleted? If you do not need the group/team that was deleted, nothing needs to be done as it has been deleted. However, if something is needed from the group/team that was deleted and it has been less than 30 days since it was deleted, open a ticket with your IT department to request that it be restored. Changes may need to be made to recovered groups/teams so they are compliant with O365 standards. Important: More than 30 days after a team has been deleted, it cannot be recovered by anyone.
Coming in the Spring of 2020, we will be implementing new policies for groups/teams that will include an expiration policy. To prepare, we will be performing the necessary cleanup of groups/teams that do not currently comply with policies/standards/usage (i.e. volume, activity, naming policies) with changes being implemented to current groups/teams. This will consist of the following:
- changing non-compliant publicgroups/teams to be private
- hidingnon-compliant groups/teams from the address book
- identifying specific groups/teams that will be deleted/added to expiration policy
If you are the owner of a group/team that will have an expiration policy applied and there is no activity in the group/team, you will be notified that your group/team is due to expire and needs to be renewed. If not renewed (either by activity occurring or an owner manually renewing it), the group/team will be deleted. Owners can still restore a deleted group up to 30 days after it has been deleted. 30 days after it has been deleted, it is permanently deleted and cannot be recovered by anyone.
If you no longer need the team/group and need to keep the files, we recommend you sync the files to your workstation before it expires.
Owners of Microsoft Teams will see renewal notifications in their team activity feed and an icon will display next to the team name indicating it is due to expire.
You can always go to Manage Team – Settings to see exactly when your team will expire if no new activity auto-renews it.
Owners of O365 groups that have not yet been teamified and have no activity will receive an email stating when their group is due to expire. Owners will receive reminder emails 30, 15 and 1 day before the expiration date which will include a link to renew or delete the group if the group is not needed any longer. You will also receive a final email a day after it has been deleted with a link to restore the group if needed.
- What are private channels in a Team?
Private channels are just that – private channels that the owner of the private channel can specify which members of the team are members of the private channel. If a team member is not a member of the private channel, they won’t see the channel listed or be able to interact with the channel.
Start with this article from Microsoft about Private channels which were introduced in 2018 to see what private channels is all about.
As an owner of a team, you may want to disable the ability for members to create private channels in your team at all. The setting is under Manage Team – Settings – Member Permissions.
Owners of a team can view all channels including private channels by going to Manage Team – Channels. However, if a team owner is not a member of a private channel, they won’t be able to see the content of the private channel, but would still be able to see it listed and can delete it.
- How do I use the chat feature in the Teams app?
There are different types of conversations in Microsoft Teams. There are channel conversations that occur inside a Microsoft Team and there are private chats (either 1:1 or group chats). You can use the Microsoft Team app to participate in 1:1 chat or group chats without ever being inside a team if you wish. Here’s some more information:
Channel conversations (in a Team channel) can be seen by all members of the team. However, in private 1:1 chats or group chats using the Chat icon in the left menu, only the people in the chat can see your messages. How to start a chat in Teams
To start a private 1:1 chat – click the New Chat icon and type in the name of the person you wish to chat with:
You can chat with:
- anyone in our organization (System Office and CCC faculty/staff/students)
- external guests who are members of a Team that you are also a member of.
You may be able to 1:1 or group chat with external guests using their business account – however, their Team environment needs to also be setup to allow external guest access and their account needs to be setup to use Teams (vs. Skype for Business).
Since CSCU Universities are external, they will have limited functionality compared to a SO/CCC faculty/staff/student, but if a CSCU University member is also a member of a team, they will be able to participate as an external guest member of that team. It is therefore recommended to communicate with someone at a CSCU University from inside a Microsoft Team versus a 1:1 chat which may not work as described above.
You cannot use chat to chat with someone’s personal email address (i.e. @gmail, @yahoo, etc.) who isn’t already a member of a Team that you are a member of. To see if you can chat with them, enter their email address into the chat field. You will see the following error if you cannot chat with them:
When creating a chat, if you want to add more people to your chat, simply type their names into the To: field:
Once you have a group chat of 2 or more people (not including yourself), you can rename the group chat if you wish. Note that the group chat is renamed for all members of the group chat, not just for you:
For group chats (chats with 3 or more people), you can also add more people to the chat at any time using the “add people” button on the side. As you see you have options as to what the new people added to your group chat have access to in regards to the chat history:
Then chat away at the bottom.
There are many icons below the chat line, check them out – the first one (the A with the pencil) allows you to use full formatting in your chat:
NOTE: When chatting with SO/CCC faculty/staff/students, in addition to chatting with the person, you can also have an audio call, voice-only call or share your screen with them if they are using the Teams app.
Sharing your screen is not available if you are using your phone or from a browser:
You can’t edit a chat once sent.
To easily find contacts you frequently chat with, you can create contact groups (at the bottom click “Create a new contact group”)- but note that you cannot send a chat to a contact group, it is just to organize them in your Contacts:
Here’s a few video tutorials on how to chat and make calls using Teams.
Here’s additional information on using chat in Microsoft Teams.
- How do I use meetings or calls in Microsoft Teams?
How to create a meeting in Teams:
- Inside the Teams client, click on Calendar on the left-hand side menu.
- In the calendar on the right-hand side, click on the block for the time you want to meet. The new meeting window will appear. In this example, it will be creating a meeting for Monday at 9 AM.
- Add a title, attendees (both required and/or optional), and select the start and end time of the meeting. NOTE – You can add attendees who are not a member of the Team involved in the meeting.
- If you want to schedule a recurring meeting use the drop-down menu to select the correct recurrence.
- If the meeting is associated with an existing MS Team (as opposed to a personal meeting), click on the Add channel field and select the correct channel from your list of Teams. You’ll need to click on the Team to view the channels. If you are unsure of the channel, it is most likely the General channel.
- Fill out the meeting details in the Details box. If your account has been enabled to use dial-in numbers, it will appear in the meeting details after the meeting is finished being created and is saved. You will see them in the invite.
- Click Save in the upper right-hand corner to save your meeting. The selected attendees will be sent an email invite.
The locations for steps 3 through 7 are noted in the image below.
How to join a meeting
Dial-in numbers are now available if you schedule your meetings using Teams. Attendees can either join using Microsoft Teams (top link in the emailed invite) or use the dial-in numbers listed and then enter the conference ID included:
During the meeting, meeting organizers will see the call-in users that are calling in using phones and will then need to admit them into the meeting:
NOTE: Meeting organizers who join the call using the dial-in numbers and not from Microsoft Teams, will need to use the PIN sent to them from Microsoft. Look in your inbox for an email like this:
Users can reset their own audio conference PIN here as well as using the Reset PIN link from inside a Teams invite.
Lots of topics on meetings/calls can be found on this link such as setting up a meeting, joining a meeting, making a call, recording meetings, etc. All should be done from within Microsoft Teams app. This link also has answers to common audio conference questions or watch this video tutorial.
However, if you have Microsoft Teams installed on a Windows desktop and are using Outlook – you may notice the “New Teams Meeting” add-in:
NOTE: This allows you to create a Microsoft Teams private meeting from inside Outlook but you cannot use it to create a Team channel meeting – this is only for creating meetings with specific participants. Also, meeting options are not currently available using this feature, therefore, we still recommend creating Team meetings from within the Teams app.
External guests will be able to participate in meetings, but their experience will be different. Refer to the external guest FAQ for more info.
- Can I use Outlook 2016 or 2019 to manage my O365 Group or Microsoft Team?
You definitely do not want to use Outlook when using a Microsoft Team. Always use the Teams app when working in your Microsoft Team. Note that there are differences between a team that started out as an O365 Group and was converted vs. a team that was created as a Team to start. The difference is what’s visible from Outlook and the address book. Refer to our FAQ item for converting an O365 Group to a Microsoft Team
You potentially may be able to use Outlook for an O365 Group. Here’s why: Most functions/features should be available from Outlook 2016 and 2019 as documented by Microsoft, but whether a feature or function is accessible from your particular install of Outlook cannot be answered. We have seen situations where the Create Group icon in the ribbon is not present as well as adding external guests as members of a group does not work. Our advice is to use OWA to manage your O365 Group. The documentation below shows how it should work from Outlook 2016 if your install supports it.
- How do I Rename an Office365 Group/Microsoft Team?
It is not currently possible to rename the underlying Group/Team, so when you are creating your group/team, select the name carefully making sure to follow the Naming Standards.
You can however rename the display name of your group/team, it still needs to adhere to the group standards. NOTE: Changing the display name does not change the underlying site name nor the group’s email address, that’s why selecting the right name when you first create the group/team is important. Multiple groups/teams can have the same display name.
- Can my group/team use my college’s domain (i.e. groupname@xxcc.commnet.edu or groupname@college.edu)?
No, all groups will have the @groups.ct.edu for the email domain and cannot use another domain.
The group’s site will be: https://ctregents.sharepoint.com/sites/<group name>
NOTE: If another group or team already exists with the same name, Microsoft will append your group name with numbers but the displayed name will still show your originally chosen name. For example, if you named your group NW-Robotics and there already was a group named NW-Robotics, your group’s site may be: sites/nw-robotics546. The best way to find out your Team’s URL is to go to your General channel and then go the channel’s SharePoint site. Look at the URL.
- What do I need to know about Public/Private groups/teams?
The person creating an Office365 group chooses whether a group is public or private when the group is created. By default, an Office365 Group is public if created in Outlook but is private if created in O365 Portal. By default, a Microsoft Team is private. You most likely want the content of your group to be only available to members not by anyone in the organization, so you will want a private group.
Public Groups/Teams
- All content available in SharePoint can be accessed by anyone in the organization without being a member of the group. That means they can edit/delete content/folders as well!
- O365 Group conversations can be seen by anyone in the organization without being a member of the group.
- Anyone can add themselves as a member of a public group/team and can subscribe to receive emails/notifications to be sent to them.
- A SO/CCC faculty/staff/student can go to “join or create a team” from the Microsoft Team app and type in the name of a public team and join it.
Private Groups/Teams
- Are only accessible to members of the group.
To change an O365 Group’s privacy setting.
To change a Microsoft Team’s privacy setting, to the right of your Team name, click “…” and then go to Edit team.
- What does it mean to be listed/hidden from the email address list?
The following apply when a group/team’s email address is listed in the email address list:
- The group’s name and email address are searchable using the Discover Groups feature.
- The group’s name and email address are searchable when entering text on an email’s recipient fields (to, cc, bcc) or by searching the email address list.
- Anyone in our organization can see the group’s name, email address, description and the list of owners and members.
- Anyone can send an email to the group’s email address even without being a member. NOTE: If group members are subscribed to the group to receive email in their inbox, they will also receive the email in their inboxes when an email is sent to the group.
- Anyone can request to join a group. The group owner does not have to accept it – but they can send it.
When a group is hidden from the email address list, it is not discoverable by searching for the name. However, if someone knows the group’s email address, they can send email to the group whether it is private or public or whether they are members or not members.
NOTE: If your group needs to have a member “send as” or “send on behalf of” the group, the group cannot be hidden from the email address list. Granting a member the ability to “send as” or “send on behalf of” is not configurable by the owner, it can only be set by request.
In the summer 2018 – Microsoft made a change that any new Microsoft Team that is created is now hidden from the email address list as well as not being displayed in Outlook under Groups. This is by design as Teams communication should be inside the Team and they want to move away from using Email.
However, if you “teamified” a group, it will still be visible in the email address list and in Outlook. You can submit a request to hide it from both after you have “teamified” it though.
- There seems to be so many ways to access my group or team’s features (mail, documents, calendar). What’s the easiest?
Microsoft Team
A Microsoft Team should be accessed using the Teams app. You can access your SharePoint site as your Microsoft Team has a SharePoint site – but be aware if you modify the team channel folder structure from SharePoint, you could make channels inaccessible. Always modify your Team’s document library from the Teams app and members of a Team should always be using the Microsoft Team app to access the team.
O365 Group
An Office365 Group has many components (mail, documents, calendar, OneNote notebook, Planner, SharePoint site) and each component can be accessed through a variety of products (Outlook 2016, files can be synced to your workstation using the OneDrive sync client, Office365 portal, individual mobile apps, etc.) making it appear more complex than it needs to be because there are so many ways to access!
You can access all the parts of the O365 Group by visiting your group’s site. The URL to your site can be found in many places. Your group’s site is always available by logging into the O365 Portal, then launching mail:
Once in the Mail app, under the Groups heading, click on your group. Once you are in your group, click the … and then select site:
Bookmarking the site will help you quickly go directly to your site. It will be in the form: https://ctregents.onmicrosoft.com/sites/<group name>. Sharing that link with non-members will show them a “You need permission to access this site.” warning as only members will be able to access your site.
When you invited members to join your group, they received an intro email welcoming them to the group. That email contains valuable links – one of them containing the link directly to your site:
Mail (i.e. Conversations): You can access your Office365 Group’s mail conversations from inside Outlook 2016, 2019, O365 portal’s mail from any browser or from a mobile device that has the Outlook Group app installed. Note that external guests will not be able to access mail conversations from your group’s site. They will be sent an individual email to their email address and will not be able to see “conversations” as other members do.
Members that are not external guests, have the choice to unsubscribe themselves from receiving email in their inbox and instead only reading email sent to the group by looking in the group’s mailbox. They can do this by unsubscribing from the group when using Outlook 2016 or 2019:
Documents (i.e. Files): We do admit this is an odd one – but Microsoft has two views into your group’s files. If you click on the Files link from Outlook or from the O365 portal:
You are only seeing a list of your files (without their folder structure). This doesn’t make any sense to us either! If you want to see your files in the folder structure, you will have to go to your group’s site and then click Documents:
Calendar: You can access your group’s shared calendar from inside Outlook’s calendar as you would any shared calendar. Note that external guests will not be able to access the shared calendar. They will be sent calendar invites to their email address and will not be able to see a shared calendar as other members do.
- Is there an app for that?
To download Microsoft Teams app, visit teams.microsoft.com
Compare Office365 Group features on different platforms (Outlook 2016, OWA, iOS, Android, etc.)
New info: Microsoft is retiring the standalone Groups app and will incorporate O365 Groups into their Outlook app.
- How do I work with my Team’s shared calendar?
Microsoft continues to work on a solution to natively display the Team’s calendar. Currently, if you want to display a team calendar, you have to manually do it. There are 2 different methods to this.
Method 1: Create a tab that will link to this team’s calendar. This will display the user’s O365 calendar and this Team’s calendar. Here’s how:
- Go to your Team’s channel and click the + to add a new tab and select Website from the list of tabs you can add:/br>
- Name your tab: “Calendar” and paste the address to your Group calendar using this form:
https://outlook.office365.com/owa/?path=/group/<insert group name>@groups.ct.edu/calendar
NOTE: If you don’t know your team’s O365 Group calendar name – open the channel’s site in SharePoint and look at the URL, your team name appears after “/sites/”:
This is what it will look like:
The user will then be able to check/uncheck any calendars they want to display:
Method 2: The other method is by creating a SharePoint page that displays the calendar entries. This will display a list of calendar events, not a month view. Here’s how:
- Go to your team’s SharePoint site and click Home, click + New, select Page as the type:
- At bottom, click “Create page”.
- Name your page whatever you want, for example Calendar and add a web part to the new page:
- When the selection comes up to select the type of web part you want to add, search for calendar then click on Group Calendar:
- Go back to your Team’s channel and click the + to add a new tab and select SharePointfrom the list of tabs you can add:
- Select the page you added from the list of available pages:
- The list of calendar entries will be displayed in Teams:
- Add calendar entries by clicking on Calendar, creating a new meeting and selecting your Team channel:
- How do I work with my O365 Group’s shared calendar?
Looking for how to work with a Team’s calendar? Check out this FAQ item when working with a Team’s calendar.
When working with O365 Group’s calendars – remember that an O365 Group’s calendar is not accessible to external guests. They will get invites emailed to them but won’t be able to access it from the Calendar link. To separate your own personal calendar entries from a group (or multiple groups you may belong to), instead of creating a calendar entry in your own calendar and inviting others, create it in the group’s shared calendar. Members of your group will then receive a calendar invite (external guests will receive it in their inbox) and they can also separate calendar invites from you and from the shared group. Remember that external guests access calendar invites different.
If you simply want to view the group’s calendar by itself from Outlook 2016, browse to your group found under Groups in the left menu and select your group. It will bring up the group’s inbox. At the top, select Calendar and it will bring up just the group’s calendar by itself:
You can also view multiple calendars together in one view in Outlook as well. First you need to add the calendar to your favorites. Scroll down to your group listed under Groups in the left menu. Right click on the group and click “Add to Favorites”:
Then, when you go to your calendar view, it will be listed as a separate calendar entry under “My Calendars” that you can then enable in your calendar view by putting a check mark next to the calendars you want to view:
When you have more than 1 calendar checked, they show up next to each other. To create a single view of all your calendars, click the arrows at the top to create a single view of all calendars (they are visually merged but are still separate calendars). Each time you add another calendar to your view, you can click the arrows to merge them or unmerge them into/from a single calendar view:
This is a single view of 3 calendars. Each calendar is a different color. To create an event in a specific calendar, click the calendar’s tab to change the focus to that calendar and then create your event as you normally would.
Group members will then receive a calendar invite because you created the event in the shared group calendar. You can see exactly which calendar you are adding an event to when you create the calendar entry:
Here is some additional information on working with your shared calendar: Microsoft’s documentation on how to schedule a meeting in the group’s calendar
- What do I need to know about co-authoring documents with others?
You can co-author documents in both Office Online and in Office products installed on your workstation. NOTE: You must be using at least version 2016 to co-author documents and co-authoring is only supported in apps that support co-authoring (Word, PowerPoint, Excel) and only with modern file formats (.docx, .pptx and .xlsx).
Microsoft provides several resources for helping you co-author documents with others:
- The basics you need to know for document collaboration and coauthoring
- Collaborate on Word documents
- Collaborate on Excel workbooks
- Having issues with co-authoring? Try this document: Troubleshooting co-authoring
We highly suggest using Word’s Track Changes feature when co-authoring documents as we are aware that when OneDrive for Business saves versions of the document to the file’s Version History that all changes made during co-authoring are saved as one version. Microsoft has a video that shows you how this works.
If you are using Word’s Track Changes features, you won’t see markup when you edit the document from Teams or using Word Online:
To use Track Changes markup/features, when you click Edit from Teams, select Open in Desktop App:
- Can I be alerted when an item is modified?
Yes! If you want to be alerted when a file/folder is modified, follow these instructions to setup an alert for SharePoint Online document libraries, O365 Group or Team sites.
- Can I stay a member of a group but stop receiving email in my inbox for emails sent to the group?
Microsoft Teams
You can follow a channel to receive direct notifications whenever there’s new channel activity. Use the Activity filter: Following to see activity in channels you are following. Here’s more info from Microsoft on following and favoriting channels.
O365 Groups
In Outlook 2016, it’s called “Subscribe/Unsubscribe” and in OWA, it’s called “Following/Not Following”.
In Outlook 2016, go to your group under Groups in the left menu and then click “Membership” in the top menu bar to toggle between “Subscribe” and “Unsubscribe”:
In the O365 portal’s mail, when you are in your group, use the drop down next to “Following” or “Not Following” to toggle between the two options. You can also click the Group Settings button and go to “Manage group email” to change further “Not Following” options:
- My group’s email address and SharePoint site are different than my group’s name. Why?
When creating your team/group, if you name it using any special character other than dash or underscore (- or _) then those characters will not appear in the email address or the site’s file location.
For example, if you name it “Black & White”, the email address will be blackwhite@groups.ct.edu and the site’s SharePoint site will be: https://ctregents.sharepoint.com/sites/blackwhite
You may also have named yours to be the same name that another one already had – so yours will be the name of your team plus some random characters so that they are unique.
- How do I change my group/team site’s home page?
Your Group/Team’s home page is a SharePoint team site. Refer to Microsoft’s documentation for information on how to change the SharePoint site.
- How do I use an Office365 Group?
- Learn about Office365 Groups
- Watch videos about Office365 Group features.
- How to join a group
- How to delete a group
- How to have a group conversation(how to reply just to the sender or reply to the group)
- How to customize your group’s SharePoint site
- Adding and removing group members
- Members can choose to leave or unsubscribe from a group– Your members can stay a member of the group but unsubscribe from receiving group emails in their inbox. Or they can choose to leave the group altogether if they want and no longer will be members of the group.
- Another great Microsoft document that summarizes how to get more out of Office365 Groups.
- Do you want to have your group’s files synced to your workstation? Here’s how to sync Office365 Group/Microsoft Team files to your PCusing OneDrive for Business. This is a great way to make the files available in your Office365 Group or Microsoft Team available right on your PC. Use the OneDrive for Business client to sync your group’s files just as you did to sync your OneDrive for Business files.
- You can manage your group’s documents better by going directly to your group’s site versus managing them from the “Files” section. The “Files” section just lists all your files – they are not grouped into their folders. However, when you go to the “Documents” section of your group’s site, you can see the folder structure, manage permissions, share files and more. Here’s how you get to your group’s site:
When in Outlook 2016 on your desktop, you will first click “Files” to get to the Home page of your site, but then just click “Documents”:
- How do I use Microsoft Teams?
- A Beginner’s Guide to Teams
- Meetings: Dial in numbers are automatically available if you schedule your meetings using Teams. Watch this video tutorial.
- Introduction to Microsoft Teams video
- Understanding Teams and Channels
- First Time Users – Teams Basics
- Quick Start video for Microsoft Teams
- Can’t find out how to do something? Search Microsoft Team’s Help Center
- Download Teams for all your devices
- How to add News to a Team’s channel
- How to have people send email to a channel in Teams
- Create a read-only folder(2nd part of this article)
- Is your team no longer active but you want to keep it around for reference? Archive your Teamto make it read-only. Archived teams still need to be renewed when the expiration policy is implemented.
This is very important when using a Microsoft Team: Because part of a Microsoft Team is an Office365 Group, there are some things you need to know about the difference and why you may not see content when it’s a Microsoft Team vs. an Office365 Group:
- You cannot merge two different Microsoft Teams, so make sure before you create a new Microsoft Team that there already isn’t one for the same purpose with the same members you intend to invite. There is no way to move conversations, chats or Planner tasks manually.
- When a Microsoft Team is deleted, so is the underlying Office365 Group.
- A Microsoft Team contains “channels” – think of them as your team’s topics. Each channel has its own email address, email conversations and files in order to organize your discussions. Email conversations that occur within a Microsoft Team channel are not visible from Outlook 2016 or OWA mail. As well as the opposite, you cannot see Microsoft Team conversations from Outlook 2016 or OWA mail. You can only use the Microsoft Team app to see channel conversations.
- A Microsoft Team channel’s email address does not use the Office365 Group format (i.e. @groups.ct.edu) – instead a channel’s email address uses the format: <unique channel id number>.groups.ct.edu@amer.teams.ms.
- If email is sent to the Microsoft Team’s connected Office365 Group (<teamname>@groups.ct.edu), members will not see it when they look at the team from inside the Teams app. You ONLY see the conversations that are in a Microsoft Team’s channel. Each channel has its own unique email address (<channel id number>.groups.ct.edu@amer.teams.ms) and is what is used for conversations per channel.
- Make sure you are being alerted the way you want to be alerted with activity notifications in Teams. First, set the notification types you want to receive to “Banner and email” and when you are not active in Teams and want to receive an email, setMissed activity emails to “As soon as possible”. You also can go to a particular channel and enable “Channel notifications” so you receive notifications for important channel activity.
- If files are not placed in a channel’s file folder, they will not be accessible when you look at it from inside the Teams app. To avoid confusion, files should only be placed in a channel’s file folder. Do not rename or delete channel folders. If you go to your Team’s SharePoint site and view the Document Library, you will see each channel’s folder and will be able to manage the files. You can create folders inside a channel’s folder as well.
- If you create a meeting in the Team’s connected group’s calendar from Outlook 2016, it will nothave all the functionality of a meeting that was created from inside the Team’s app. To get all the functionality of a Microsoft Team meeting, it must be created from inside the Team app.
- How do external guests access O365 groups/Microsoft Teams?
If an external guest already has a Microsoft Account associated with their email address, they would use that to login the O365 group/Microsoft Team. CSCU institutions should use their institution email address (i.e. not a private Yahoo/Gmail account).
If a non-CSCU external guest doesn’t already have a Microsoft Account associated with their email, they would first need to create one by visiting https://login.live.com and clicking on the Create One link:
Once they have created a Microsoft Account that is associated with the email address that was invited to the O365 Group/Microsoft Team, they will be able to access the group/team.
If this is the first time they are joining a SO/CCC Microsoft Team, they will need to accept permissions for accessing the team before they can participate as a member of the team:
If a user belongs to teams in different organizations, they will need to switch between organizations as they access teams in those other organizations:
The System Office/CCC organization will be shown as “CSCU”. Each CSCU University has their own organization and will be listed here if you are an external guest in their organization.
The next FAQ item explains the difference between what an external guest and a CCC or SO Faculty/Staff/Student can access.
- How does external guest access differ from a CCC or System Office Faculty/Staff/Student?
External guests are anyone that is not a System Office or CCC Faculty/Staff/Student. They will access your group by logging in to a Microsoft Account using the same email address you invited to join your group.
For CSCU institutions: CCSU, ECSU, WCSU, SCSU and Charter Oak members. You will need to add/invite their CSCU account as a member and they will use their CSCU Microsoft Account to login.
Users without CSCU accounts: You can also invite non-CSCU users to your group/team. They will need to have a Microsoft Account associated with the email address you invite. If they don’t already have one, they can create one by visiting: https://login.live.com and clicking on the Create one link.
Microsoft Teams
To add an external guest to your Microsoft Team, simply enter their email address when adding members:
When you click “Add user as a guest” you will then be able to add them to your team:
They will receive an email with a link to open Microsoft Teams:
Once they have launched the Teams app and accepted the permissions:
they will be able to join in on Teams activities.
Currently, External guests:
- Can use the Microsoft Teams app but will have a different experience.
- Can use the chat feature – but they can only chat with people who are in a team that the external guest is a member of.
- May be able to use 1:1 chat to chat with external guests that are not in a team you are in BUT it is dependent on their Team settings and may not be reachable by chat if their settings are not setup to use Teams. You may see something like this:
- Does not have access to the Meetings icon in the left menu, but will receive emails for meetings and can create Meet Now meetings in a Team channel
- Cannot be an owner of or add members to a team.
- Cannot browse/search/join/create teams. They need to be added as members of a team.
O365 Groups
To add an external guest to your O365 Group, follow these instructions by using the O365 Portal (don’t use the Outlook app) and accessing your group, then click the members tab.
External guests have limited access to an Office365 group than CCC and System Office Faculty/Staff/Students. External guests will receive an email with instructions on how to access your group when they are invited. All of the external guest’s interactions occur via email or by visiting the site’s URL, they do not access the group from Outlook or from the OWA group interface. It may be helpful for external guests to save the “Welcome email” from your group as it contains links they will use to get access to the group’s files.
Currently, external guests:
- Cannot browse our O365 groups
- Will not see the group listed under “groups” in their inbox – they will only see groups from their own organization
- Cannot add or remove group members from the group
- Cannot view the group calendar – (they will get calendar events via email instead)
- Cannot modify calendar events
- Cannot visit the Conversations tab from the group’s site – (instead, they will receive email and can reply-to-all to reply to the group)
“Inviting guests” means adding them as a member of your group. Once they are members of your group, they will have access to all of the group’s documents. You will not have to “share” documents or folders with members of your group to provide them access to documents.
NOTE: Using the “invite members” link should be used only to invite members of our organization (i.e. not external guests) to join your group:
Refer to this very good resource to learn more about External Guest access to an Office365 Group.